개요
일반적으로 ReyclerView에서 Drag and Drop을 구현할 때는 ItemTouchHelper를 사용해서 구현합니다. 하지만 두 개 RecyclerView 사이에서 Drag and Drop을 구현하기에 어려움이 있어 DragListener를 통해 구현해 보았습니다.
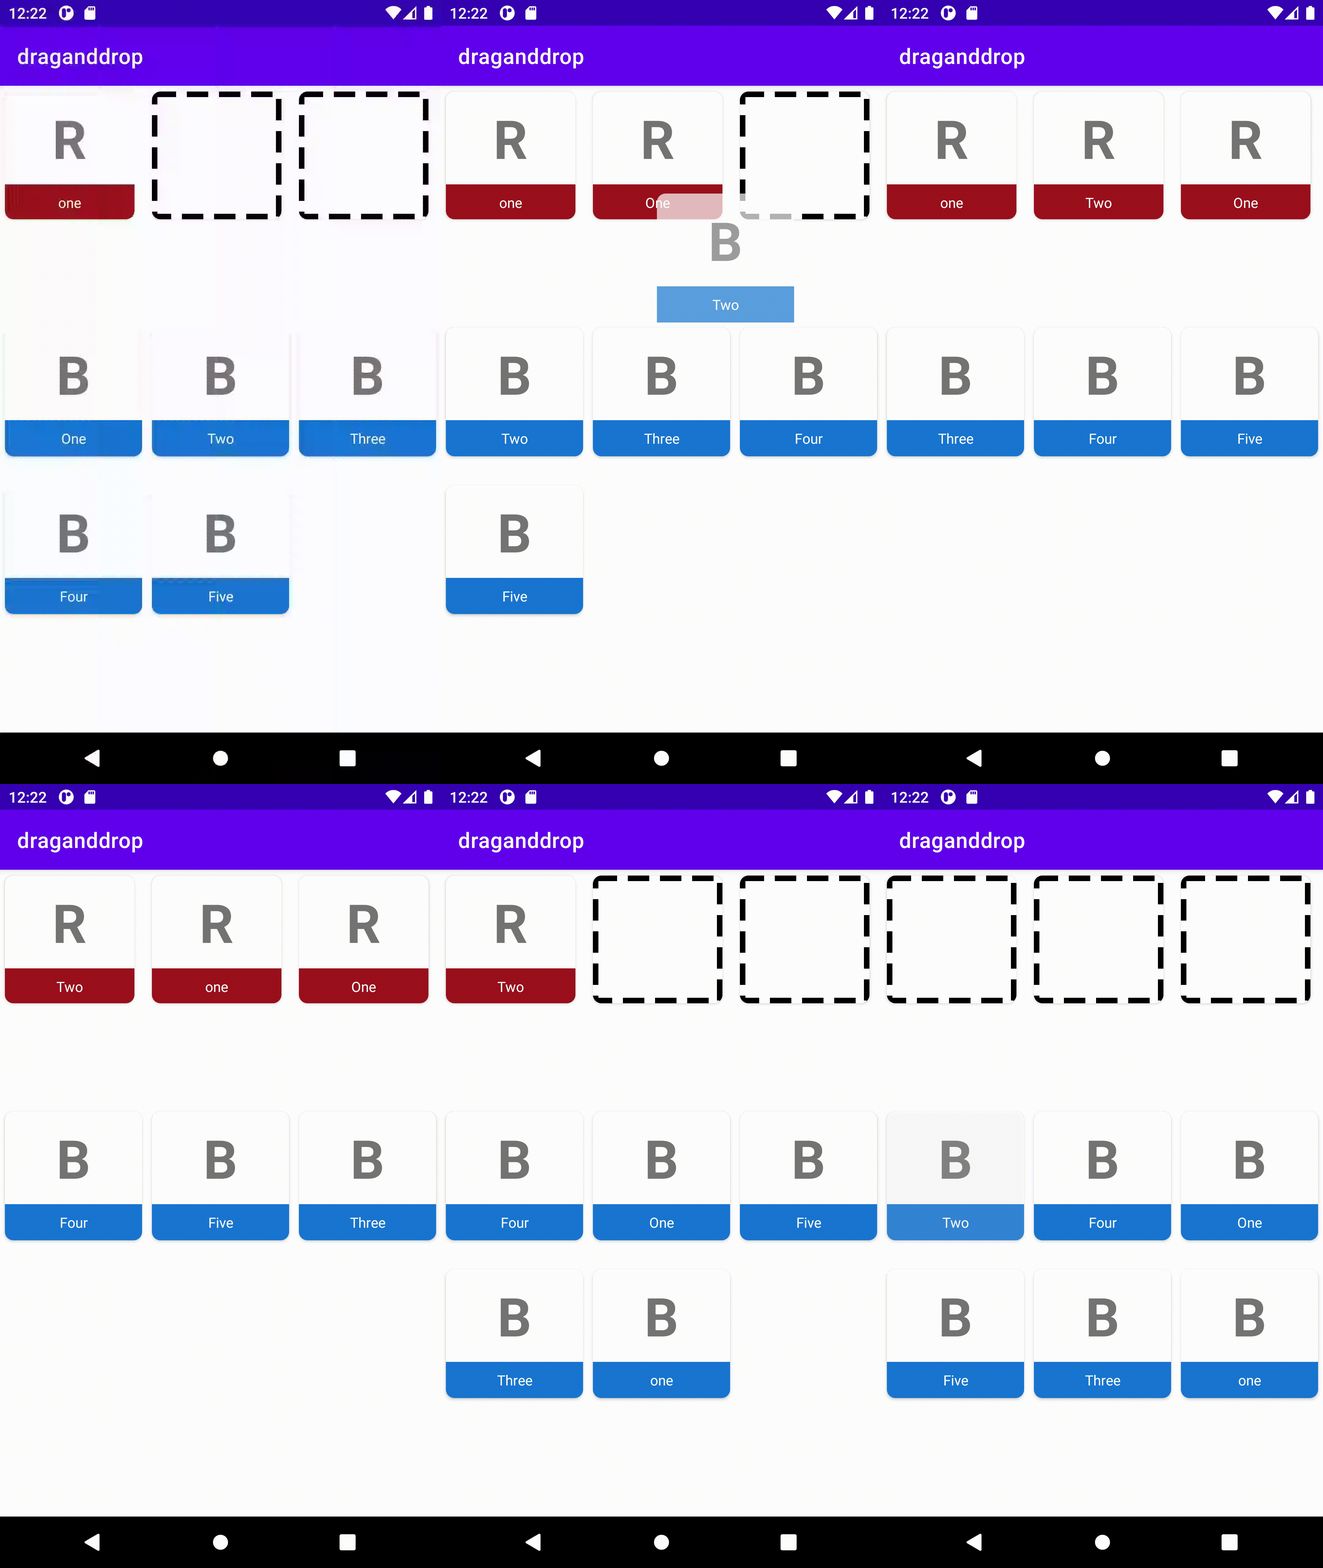
해당 Drag and Drop을 구현하기 위해 ListAdpater, ViewModel, Databinding을 사용하였습니다. 다음은 실제로 구현한 화면입니다.

설명
우선 Drag and Drop을 구현하기 위해 크게 2개가 필요합니다.
DragListener: RcyclerView와 ViewHolder에 DragListenr를 등록하기 위한 abstarct class입니다.ItemModifyListener: ReyclerView의 데이터를 수정하고 반영하기 위한 interface입니다.
기본 코드는 다음과 같습니다.
DragListener.kt
abstract class DragListener(
    private val listener: ItemModifyListener,
    private val topRecyclerviewId: Int,
    private val bottomRecyclerviewId: Int,
) : View.OnDragListener {
    abstract val topMaxItemCount: Int
    abstract val topMaxItemCount: Int

    override fun onDrag(view: View, event: DragEvent): Boolean {
        /** 생략 **/
    }
}
매개 변수로 두 개의 RecyclerView의 id와 ItemModifyListener를 가져야 합니다. 또한 각 RecyclerView에 개수에 제약을 두기 위한 변수로 topMaxItemCount, topMaxItemCount를 abstarct로 선언합니다.
ItemModifyListener.kt
interface ItemModifyListener {
    fun setTopData(list: MutableList<SimpleModel?>)
    fun setBottomData(list: MutableList<SimpleModel?>)
}
DragListener.kt의 onDrag부분을 자세히 보면 다음과 같습니다.
override fun onDrag(view: View, event: DragEvent): Boolean {
        val viewSource = event.localState as View
        val targetRecyclerView: RecyclerView
        val sourceRecyclerView: RecyclerView = viewSource.parent as RecyclerView

        if (event.action == DragEvent.ACTION_DROP) {
					val viewId = view.id
				/* 중략 */
				}
}event.localState를 통해서 현재 내가 Drag 하는 View의 정보를 가져옵니다.
- sourceRecyclerView : 현재 내가 드래그하는 RecyclerView
- targetRecyclerView: 내가 드래그 해서 옮기는 RecyclerView
when (viewId) {
                topRecyclerviewId -> {
                    targetRecyclerView = view.rootView.findViewById(topRecyclerviewId) as RecyclerView
                }
                bottomRecyclerviewId -> {
                    targetRecyclerView = view.rootView.findViewById(bottomRecyclerviewId) as RecyclerView
                }
                else -> {
                    targetRecyclerView = view.parent as RecyclerView
                    targetPosition = targetRecyclerView.getChildAdapterPosition(view)
                }
            }
그리고 viewId에 따라 targetRecyclerView를 지정해줍니다. 이는 RecyclerView 내부에서 아이템 외에 영역에 드롭했을 때 해당 아이템을 추가하기 위한 코드입니다.
if (targetRecyclerView.id == sourceRecyclerView.id) {

				//같은 Reyclerview에서 아이템 변경
} else {
    if (targetAdapter?.currentList?.any { it == null } == true || targetAdapter?.currentList?.any { it.isRed } == true) {
        // 1번 : if문을 통해서 targetAdpater 구분
    } else {
				// 2번
    }
}
만약 한쪽의 RecyclerView에만 개수 제약이나 ViewHolder를 구분해야 한다면 else 부분에 if 문을 두어서 구분을 하였습니다. 이는 나중에 함수나 좀 더 제너릭 하게 변경해야 할 것 같습니다.
만약 그냥 제약 없이 두 개의 RecyclerView에서 Drag and Drop을 한다면 2번만 구현하시면 됩니다. 자세한 구현부는 아래 제 Github를 참고하시면 됩니다.
실제로 사용하실 때는 다음과 같이 사용하면 됩니다.
class DragAdapter(private val dragListener: DragListener) :
    ListAdapter<SimpleModel, RecyclerView.ViewHolder>(diffUtil) {

    inner class BlueViewHolder(private val binding: CardItemBinding) :
        RecyclerView.ViewHolder(binding.root) {
        fun bind(text: SimpleModel) {
            binding.title.text = text.name
            binding.root.setOnLongClickListener { view ->
                val data = ClipData.newPlainText("", "")
                val shadowBuilder = View.DragShadowBuilder(view)
                view?.startDragAndDrop(data, shadowBuilder, view, 0)
                false
            }
            binding.item.setOnDragListener(dragListener)
        }
    }
	//생략
		override fun getItemViewType(position: Int): Int {
		        return if (currentList[position] == null) EMPTY_TYPE
		        else if (currentList[position].isRed) RED_TYPE
		        else BLUE_TYPE
		    }
}
Drag and Drop을 만들려는 Adapter에 DragListener를 등록해줍니다. 그리고 Long Click 시 Drag and Drop이 되도록 DragShadowBuilder를 생성해줍니다.
RecyclerView마다 서로 다른 View를 만들기 위해 ViewType을 적용합니다. 이후 BindingAdpater에 다음과 같이 적용해주시고 사용하시면 됩니다.
object CommonBindingAdapter {
    @BindingAdapter(
        value = ["item", "listener"]
    )
    @JvmStatic
    fun bindDragRecyclerview(
        view: RecyclerView,
        data: List<SimpleModel?>?,
        listener: ItemModifyListener
    ) {
        val dragListener: DragListener =
            object : DragListener(
                listener,
                R.id.top_recycler_view,
                R.id.bottom_recycler_view
            ) {
                override val topMaxItemCount: Int
                    get() = 3
                override val bottomMaxItemCount: Int
                    get() = 0
            }

        view.setHasFixedSize(true)
        view.setOnDragListener(dragListener)
        data.let {
            val adapter = view.adapter as? DragAdapter
            adapter?.submitList(data) ?: run {
                view.layoutManager = GridLayoutManager(view.context, 3)
                view.adapter = DragAdapter(dragListener).apply {
                    submitList(data)
                }
            }
        }
    }
}
예제의 모든 코드는 아래의 Github에서 확인이 가능합니다. (22.09.28 일자로 RecyclerViewDragAdapter로 통합하였습니다. DragListenr + ItemModifyListener 통합)
https://github.com/ArdorHoon/DragAndDropTwoRecyclerView
GitHub - ArdorHoon/DragAndDropTwoRecyclerView: Example of code for Drag and drop in different Recyclerview
Example of code for Drag and drop in different Recyclerview - GitHub - ArdorHoon/DragAndDropTwoRecyclerView: Example of code for Drag and drop in different Recyclerview
github.com
'개발 > Android' 카테고리의 다른 글
| [Android] MVVM 패턴 및 Clean Architecture, Android Jetpack 적용 예제 (0) | 2022.11.02 |
|---|---|
| [Android] 여러 개의 LiveData를 한번에 핸들링하는 MediatorLiveData (0) | 2022.10.13 |
| [Android] 런처앱(Launcher app)에서 Widget 생성하기 (0) | 2022.09.01 |
| [Android] DataBinding이란? (0) | 2022.08.14 |
| [Android] The emulator process for AVD has terminated 오류 해결 (0) | 2022.07.09 |


댓글